
Fancy Label Frames
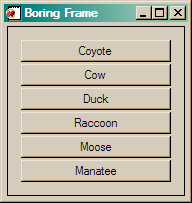
QUESTION: OK, I know how to put a frame around a collection of button widgets (see the example on the left below), but I've seen these neat label frames, with a nice label in them to indicate something about the widgets I'm grouping (see the example on the right below). How do I make something like that?
 |
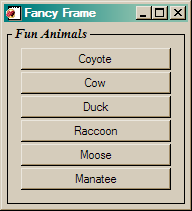 |
| Plain, ol' boring frame on the left, and a fancy frame on the right. | |
![]()
ANSWER: Alas, these kind of fancy label widgets are not built into IDL. You have to create them yourself. But, thanks to the sharp programmers at ITTVIS, who first showed me how to do this, it it easy to do.
The secret is a bit of widget jujutsu involving bulletin board bases and widget geometry. To create boring base frames, of course, all you have to do is set the FRAME keyword on the base that will hold the grouped widgets. For example, the IDL code that produced the figure on the left, above, looks like this.
     PRO BoringFrame
        tlb = Widget_Base(COLUMN=1, Title='Boring Frame')
        base = Widget_Base(tlb, COLUMN=1, /FRAME, XPAD=10, YPAD=10)
        button = Widget_Button(base, Value='Coyote', SCR_XSIZE=150)
        button = Widget_Button(base, Value='Cow', SCR_XSIZE=150)
        button = Widget_Button(base, Value='Duck', SCR_XSIZE=150)
        button = Widget_Button(base, Value='Raccoon', SCR_XSIZE=150)
        button = Widget_Button(base, Value='Moose', SCR_XSIZE=150)
        button = Widget_Button(base, Value='Manatee', SCR_XSIZE=150)
        Widget_Control, tlb, /REALIZE     END
In this code, the base with the frame is a child of the parent base (the top-level base, in this case, but it can be any parent base). To create a fancy base, with a label, you must insert a bulletin board base between the parent base and the grouping base. A bulletin board base is a base with neither the COLUMN nor ROW keyword set. Children of bulletin board bases are typically stacked up on top of one another. (You may think this is strange, but it turns out to be enormously useful in many cases.) But the children can also be placed in specific locations in bulletin board bases by specifying X and Y offsets from the upper-left corner of the bulletin board base.
To create a fancy label base, we take advantage of this property of bulletin board bases. First, we put a label into the bulletin board base. Immediately after we do so, we check the geometry of the label widget to see how big it is in the Y direction. We can do this with the GEOMETRY keyword to Widget_Info. The Y size is given my the YSize field in the geometry structure that is returned by Widget_Info. The code looks like this. Note that the label is offset in the X direction by five pixels, in this case, to move it away from the left side of the base just a little bit.
    tlb = Widget_Base(COLUMN=1, Title='Fancy Frame')
   bulletinBoardBase = Widget_Base(tlb)
   label = Widget_Label(bulletinBoardBase, value=' Fun Animals ', XOFFSET=5)
   labelGeometry = Widget_Info(label, /GEOMETRY)
   labelYSize =  labelGeometry.ysize
The next step is to create the frame base, by putting it into the bulletin board base, too, but offsetting it in the Y direction by only one-half of the label's Y size. The code looks like this.
    fancyBase = Widget_Base(bulletinBoardBase, COLUMN=1, /FRAME, $
       YOFFSET=labelYSize/2, YPAD=10, XPAD=10)
The fancy label frame is completed, by creating another label, identical to the first, which can be stacked on top of the frame base.
label = Widget_Label(bulletinBoardBase, value=' Fun Animals ', XOFFSET=5)
The buttons (or other widgets) are then made children of the frame base in the normal way.
Here is the IDL code that produced the figure on the right, above. It is only slightly modified to produce an even fancier label on Windows machines.
    PRO FancyFrame         tlb = Widget_Base(COLUMN=1, Title='Fancy Frame')
                    ; Widget jujutsu to create fancy label frames.
           IF !VERSION.OS_FAMILY EQ 'WINDOWS' THEN fancyFont = 'Times*16*Italic*Bold'
           bulletinBoardBase = Widget_Base(tlb)
           thisLabel = ' Fun Animals '
           label = Widget_Label(bulletinBoardBase, VALUE=thisLabel, XOFFSET=5, FONT=fancyFont)
           labelGeometry = Widget_Info(label, /GEOMETRY)
           labelYSize =  labelGeometry.ysize
           fancyBase = Widget_Base(bulletinBoardBase, COLUMN=1, /FRAME, $
                YOFFSET=labelYSize/2, YPAD=10, XPAD=10)
           label = Widget_Label(bulletinBoardBase, VALUE=thisLabel, XOFFSET=5, FONT=fancyFont)

        button = Widget_Button(fancyBase, Value='Coyote', SCR_XSIZE=150)
        button = Widget_Button(fancyBase, Value='Cow', SCR_XSIZE=150)
        button = Widget_Button(fancyBase, Value='Duck', SCR_XSIZE=150)
        button = Widget_Button(fancyBase, Value='Raccoon', SCR_XSIZE=150)
        button = Widget_Button(fancyBase, Value='Moose', SCR_XSIZE=150)
        button = Widget_Button(fancyBase, Value='Manatee', SCR_XSIZE=150)
        Widget_Control, tlb, /REALIZE     END
Caveat
Be aware that there is one disadvantage in using fancy frame base widgets like this. If the widgets you are including in the fancy frame base widget will change size during program execution, there will be problems. Normal column and row base widgets will change size to accommodate the size of their children. Bulletin board base widgets will not. They must be explicitly sized after they are realized if you wish them to change size. In practice, this means only widgets that will remain the same size throughout program execution should be used in fancy frame base widgets.
![]()
Version of IDL used to prepare this article: IDL 7.0.3.
![]()
Copyright © 2008 David W. Fanning
Last Updated 4 October 2008