
IDL Library Installation
QUESTION: How do I download and install the Coyote Library? For that matter, how do I install any third-party IDL library?
![]()
ANSWER: You won't work with IDL for too long before you realize that much of the power of IDL comes from using IDL code found in third-party libraries on the Internet. The IDL Astronomy Library, maintained by Wayne Landsman, and the Johns Hopkins Applied Physics Lab Library, maintained by Ray Sterner, are two of the most famous and widely used. IDL has an extremely robust tradition of excellent IDL programmers sharing their best work with the IDL community. To take advantage of this software, you have to know how to install the library of code and place it on your IDL path (i.e., the !PATH system variable) so you can use it.
The Coyote Library is another extremely popular library of IDL code. Indeed, it has become almost too popular and you will find parts or all of it incorporated into other libraries that you find on the Internet. (The NASA Astronomy Library, for example, now uses the Coyote Library for all of its graphic operations.) This is extremely gratifying to the library's author, but causes many gray hairs, too, because the Coyote Library distributed with these other libraries is often out of date. This makes it difficult for many users to install the Coyote Library properly and make use of all of its functionality.
The installtion and set-up directions here can be used to install the Coyote Library, the Catalyst Library, or indeed any third-party IDL library you care to use in your IDL installation.
Managing Your IDL Path
A great many IDL programmers are still unsure how to set up and use their IDL path. The IDL path is a list of directories that are searched when IDL needs to find the source code for a user-written IDL "command" or program. The typical scenario is that a young graduate student comes into a lab and their IDL installation is "configured" for him or her by a senior graduate student, whose own IDL installation was "configured" for them another senior graduate student, etc. In this scenario it will turn out that everyone in the lab is using an IDL start-up script that was written in 1986 by the founder of the lab, everyone writes IDL code as if it were a direct translation of a FORTRAN program, and not a single person in the lab knows how or why their IDL path has gotten so convoluted and confusing. The fact that IDL even "works" seems like magic to them!
When wading into Coyote Library installation problems, it is not the least bit unusual (especially on UNIX systems), to find 4-5 old and out-of-date copies of the Coyote Library in a user's IDL path. The user almost never knows how they got there.
Let me be absolutely clear about this. You want ONE version of the Coyote Library in your IDL path!
(A new program, named cgFindCoyoteFiles has been added to the Library to help you find and eliminate old and out-dated versions of Coyote Library files. Running the program will print of list of directories on your IDL path that the program strongly suspects contain Coyote Library files. If you find directories that do contain old and out-dated Coyote programs, you should delete those directories before proceeding.)
The general procedure is to first download the entire Coyote Library (or Catalyst Library) as a zip file. Then, unzip the file and extract the programs to a directory that is already on your IDL path, or to a directory you intend to put on your IDL path (see detailed instructions below). You can also download the Coyote and Catalyst Libraries from a Subversion code repository. You must have a Subversion client installed to use the repository, however. (Many UNIX systems have this installed by default and I highly recommend Windows users download the TortoiseSVN application to use for this purpose.) The Subversion repository is highly recommended as this is the main repository for all the work I do on these Libraries. You can use the repository to update to the very lastest version of the Libraries, or to a particular tagged release. The zip files always contain the very latest version of the Library.
Note that I try extremely hard to keep the Coyote Library free of outside influence. That is to say, even though I personally use many routines from both the IDL Astronomy Library and the Johns Hopkins Applied Physics Lab Library, I do not use these routines in Coyote Library programs. Thus, there are no library dependencies in the Coyote Library, except from the normal IDL user library and from the Coyote Library itself. (I can think of a single exception to this rule, cgTerminatorMap, but it is clearly identified as such.) I try hard to keep the Coyote Library away from cutting edge IDL improvments, but life does goes on. If you are using an older (e.g., IDL 6.3) version of IDL you may find some routines in the Library no longer working for you. If you do, contact me about the problem. It's possible I can retreive an older version of the program that works for you.
Installation Procedures
![]()
Steps for Installing the Coyote Library on Windows
- Download the Coyote Library zip file. You can put the zip file wherever you like on your hard drive. (Note that, if you prefer, you can download the Coyote Library from an open-source Google Code Subversion repository into a directory on your machine using either a Subversion client or Subversion commands directly.)
- Extract the zipped files to a local directory. Note that the files will install
themselves into a directory named "coyote". It is best not to extract these files to
your Desktop. This will cause problems later on. For example, on my C: drive on my Windows
machine, I have
a top-level directory named idl. This is the location I would use as the "extraction" directory and where
I would place the "coyote" directory. I am going to use the following directory in my examples
below.
C:\idl\coyote
You should substitute into the commands the actual location where you installed the files.
Installation Alternatives
It would be perfectly fine if you wanted to install the Coyote files in a directory other that the coyote directory described above. You could, for example, install the file into a coyote directory located in the lib directory in the main IDL distribution (probably something like C:\Program Files\ITT\IDL8.3\lib), if you had permission to do so. Or, you can name the directory something entirely different. It is not important what you name it, but how it is found on your IDL path. - Given that you have extracted the zip file into the directory above, how do you get the files
on your IDL path? There are many possibilities. Let me tell you one I would not recommend.
If you add this directory as a project to your IDL Workbench, I strongly recommend that you do not let IDL manage the path to the files for you. I do recommend you add the files as a project in your Workbench, since this will give you great access to the source code documentation, just do not ever let IDL manage the paths for you. If you add them to your Workbench as a project be sure go to the Project -> Properties -> IDL Project Properties tab and deselect the button that says “Update IDL path when project is opened or closed.”
To add the files to your IDL path in your IDL Workbench, go to the Window -> Preferences -> IDL -> Paths tab. Click the Insert... button and search for the coyote directory. Next, select the coyote directory and use the Move Up button to move the coyote directory in front of (toward the top of the window) of other directories on your path. You should now be good to go. (Note that if you are installing both the Coyote and Catalyst Libraries, the Coyote Library should be positioned before the Catalyst Library in your path list, as programs in the Coyote Library must be found before they are used by programs in the Catalyst Library.) If you still find occasional name conflicts, contact me and I'll see what I can do about it. Some name conflicts are probably inevitable. Play around with the order of your files in this path list until you are happy.
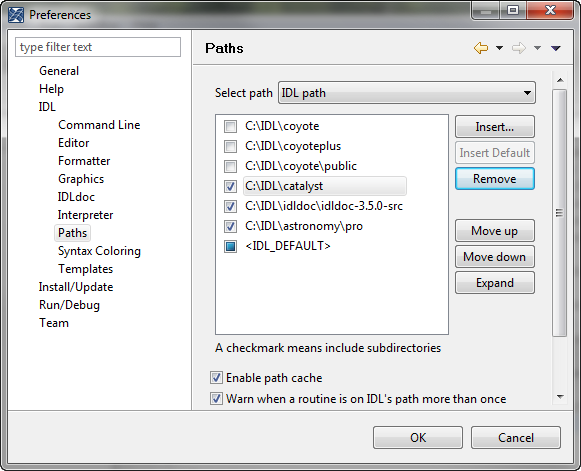
Adding the Coyote Library to your IDL Path. - If you are not using the IDL Workbench to run IDL, you might be able to do something similar to the IDL Workbench instructions if you are using an IDLDE. There the IDL path preferences are probably in File -> Preferences -> Path. The Insert... button is still there, but you need to use the arrow buttons to the right of the path list to move and order the directories on your IDL path.
- If you are using the IDL command line version, or all else fails, you can include the following IDL command in your IDL start-up file, or
you can simply type the command at the IDL command line before you run any Coyote program:
!PATH = Expand_Path('+C:\idl\coyote') + ';' + !PATHNote the plus sign (+) at the front of the coyote directory name. This tells IDL to search all of the sub-directories of these directories and add them to the path, too. Note also that directories are separated by a semi-colon on Windows machines. You can have a command like this for as many third-party libraries as you want to install on your machine. Just pay attention to the order in which you define them. The command above adds the library files to the front of the IDL path. So, if you were using this command to add multiple libraries, the commands would be listed in the reverse order in which they are going to be found. For example, to add both the Catalyst and Coyote Libraries, you would add them like this, since the coyote directory must be found first on the IDL path, before the catalyst directory.:
    ; External libraries added in REVERSE search order!
   !PATH = Expand_Path('+C:\idl\catalyst')  + ';' + !PATH
   !PATH = Expand_Path('+C:\idl\coyote')  + ';' + !PATH
Another way to write this command is like this, in which the libraries are added in the order in which they will be searched:
   !PATH =  Expand_Path('+C:\idl\coyote') + ';' + $
            Expand_Path('+C:\idl\catalyst') + ';' + $             !PATH
The Coyote Library command, cgAddToPath, can also be used to add the current directory to the front of the IDL path.
![]()
Steps for Installing the Coyote Libray on UNIX
- Download the Coyote Library zip file. You can put the zip file wherever you like on your hard drive.
- Extract the zipped files to a local directory. It is best not to extract the files to
your Desktop. This will give you problems later on.
On my local hard drive on my UNIX machine, I have
a top-level directory named ~/fanning/idl. This is the location I would use as the "extraction" directory and where
I would place the "coyote" directory. I am going to use the following directory in my examples
below.
/home/fanning/idl/coyote
You should substitute into the commands below the actual location where you installed the files.
Installation Alternatives
It would be perfectly fine if you wanted to install the Coyote files in a directory other that the coyote directory described above. You could, for example, install the files into a coyote directory located in the lib directory in the main IDL distribution (probably something like /usr/local/ITT/idl70/lib), if you had permission to do so. Or, you can name the directory something entirely different. It is not important what you name it, but how it is found on your IDL path. - Given that you have extracted the zip file into the directory above, how do you get the files
on your IDL path? There are many possibilities. Let me tell you one I would not recommend.
If you add this directory as a project to your IDL Workbench, I strongly recommend that you do not let IDL manage the path to the files for you. I do recommend you add the files as a project in your workbench, since this will give you great access to the source code documentation, just do not ever let IDL manage the paths for you. If you add them to your Workbench as a project be sure go to the Project -> Properties -> IDL Project Properties tab and turn off the button that says “Update IDL path when project is opened or closed.”
If you make the files a project in your IDL Workbench then add the directory to the IDL path by going to the Window -> Preferences -> IDL -> Paths tab. Click the Insert... button and search for the coyote directory. Next, select the coyote directory and use the Move Up button to move the coyote directory in front of (toward the top of the window) of other directories on your path. (Note that if you are installing both the Coyote and Catalyst Libraries, the Coyote Library should be positioned before the Catalyst Library in your path list, as programs in the Coyote Library must be found before they are used by programs in the Catalyst Library.) You should now be good to go. If you still find occasional name conflicts, contact me and I'll see what I can do about it. Some name conflicts are probably inevitable. Play around with the order of your files in this path list until you are happy.
- If you are not using the IDL Workbench to run IDL, it is more likely that you are defining your
IDL path be defining environment variables in a .cshrc, .bashrc, or .profile file. For
example, in a .bashrc file, you could add the coyote directory to your current IDL path ($IDL_PATH) by adding a command like this:
export IDL_PATH=+/home/fanning/idl/coyote:$IDL_PATH
Note the plus sign (+) in front of the coyote directory name. This is an indication that IDL should expand this path to include all of the sub-directories under this directory and add these to the IDL path, too.
I typically define my IDL path in an IDL start-up file. The start-up file is also defined by an environment variable ($IDL_STARTUP). For example, in my .profile file I have this line:
export IDL_STARTUP=/home/fanning/idl/idlstartup.pro
Then, in my IDL start-up file, which is simply a text file that gets executed upon starting up IDL, as if I were typing the commands at the IDL command line, I have the following lines of code which define my IDL path in the order in which the directories appear here:
   !PATH =  Expand_Path('+~/idl/coyote') + ':' + $
            Expand_Path('+~/idl/catalyst') + ':' + $
            Expand_Path('+~/idl/david') + ':' + $
            Expand_Path('~/idl/idl_util') + ':' + $             !PATH
Note the plus sign (+) at the front of the coyote and catalyst directory names. This tells IDL to search all of the sub-directories of these directories and add them to the path, too. Note also that directories are separated by colons in a UNIX environment.
- If all else fails, you can simply type the following IDL command at the IDL command line before you run any Coyote program:
IDL> !PATH = Expand_Path('+~/idl/coyote') + ':' + !PATHNote the plus sign (+) at the front of the coyote directory name. This tells IDL to search all of the sub-directories of these directories and add them to the path, too. The Coyote Library command, AddToPath, can also be used to add the current directory to the front of the IDL path.
![]()
Resolving Naming Conflicts
Not all naming conflict problems are easily resolved. If you think you are still having problems after following this advice, here is how to determine what the problem is. First of all, determine which file actually got compiled. For example, if you are running into a problem with a program like PSCONFIG, it is likely that you may have another program with this name on your path, and you are compiling this first, rather than the one you want in the coyote directory. To see which one you compiled, type this:
IDL> Help, /SOURCE
Now search the output list for “PSCONFIG” and you will find where IDL located the file.
Another way to do this, assuming you know the name of the file you are looking for, is to use the File_Which command in IDL:
IDL> Print, File_Which('psconfig.pro') C:\IDL\coyote\psconfig.pro
Typically, file naming conflicts are resolved by either moving directories around on the IDL path, or by deleting old files from other directories that are no longer needed. (The latter is highly recommended for the Coyote directory. And you can chase down and eliminate old and out-dated Coyote libraries with the cgFindCoyoteFiles program.)
Another way to check for multiple coyote directories on your IDL path is to type the Coyote Library command PrintPath. This will list all the directories on your IDL path in the order in which they are searched, one directory on each output line. You can search the output for "coyote," for example, to find and eliminate multiple coyote directories on your path. (You can specify the name of a file as an argument to PrintPath to write the output to a file for easier searching if you have many directories on your IDL path.)
   IDL> PrintPath         C:\IDL\coyote         C:\IDL\catalyst\resource
        C:\IDL\catalyst\source\applications\dataviewer\source
        C:\IDL\catalyst\source\applications
        C:\IDL\catalyst\source\coordinates         C:\IDL\catalyst\source\core
        C:\IDL\catalyst\source\data         C:\IDL\catalyst\source\graphics
        C:\IDL\catalyst\source\interactions
        C:\IDL\catalyst\source\ographics
        C:\IDL\catalyst\source\utilities         C:\IDL\catalyst\source\widgets
        C:\IDL\catalyst\templates         C:\IDL\catalyst
        C:\IDL\coyoteplus         C:\IDL\snake\source         C:\IDL\snake
        C:\IDL\idldoc\idldoc-3.4.3         C:\IDL\astronomy\pro
        C:\IDL\jhuapl         C:\IDL\TeXtoIDL
        C:\Program Files\ITT\IDL71\lib\bridges
        C:\Program Files\ITT\IDL71\lib\dicomex
        C:\Program Files\ITT\IDL71\lib\hook
        C:\Program Files\ITT\IDL71\lib\imsl
        C:\Program Files\ITT\IDL71\lib\itools\components
        C:\Program Files\ITT\IDL71\lib\itools\framework
        C:\Program Files\ITT\IDL71\lib\itools\ui_widgets
        C:\Program Files\ITT\IDL71\lib\itools
        C:\Program Files\ITT\IDL71\lib\obsolete
        C:\Program Files\ITT\IDL71\lib\utilities
        C:\Program Files\ITT\IDL71\lib\wavelet\data
        C:\Program Files\ITT\IDL71\lib\wavelet\source
        C:\Program Files\ITT\IDL71\lib
        C:\Program Files\ITT\IDL71\examples\data
        C:\Program Files\ITT\IDL71\examples\demo\demodata
        C:\Program Files\ITT\IDL71\examples\demo\demosrc
        C:\Program Files\ITT\IDL71\examples\demo
        C:\Program Files\ITT\IDL71\examples\doc\bridges\COM
        C:\Program Files\ITT\IDL71\examples\doc\bridges
        C:\Program Files\ITT\IDL71\examples\doc\dicom
        C:\Program Files\ITT\IDL71\examples\doc\file_io
        C:\Program Files\ITT\IDL71\examples\doc\image
        C:\Program Files\ITT\IDL71\examples\doc\itools
        C:\Program Files\ITT\IDL71\examples\doc\language
        C:\Program Files\ITT\IDL71\examples\doc\objects
        C:\Program Files\ITT\IDL71\examples\doc\plot
        C:\Program Files\ITT\IDL71\examples\doc\sdf
        C:\Program Files\ITT\IDL71\examples\doc\shaders
        C:\Program Files\ITT\IDL71\examples\doc\signal
        C:\Program Files\ITT\IDL71\examples\doc\utilities
        C:\Program Files\ITT\IDL71\examples\doc\widgets
        C:\Program Files\ITT\IDL71\examples\HP_TIFF
        C:\Program Files\ITT\IDL71\examples\imsl
        C:\Program Files\ITT\IDL71\examples\misc
        C:\Program Files\ITT\IDL71\examples\mjpeg2000
        C:\Program Files\ITT\IDL71\examples\ogc\wcs
        C:\Program Files\ITT\IDL71\examples\ogc\wms
        C:\Program Files\ITT\IDL71\examples\widgets\wexmast
        C:\Program Files\ITT\IDL71\examples\widgets
        C:\Program Files\ITT\IDL71\examples         C:\IDL\default
![]()
Version of IDL used to prepare this article: IDL 7.1.
![]()
![]()